

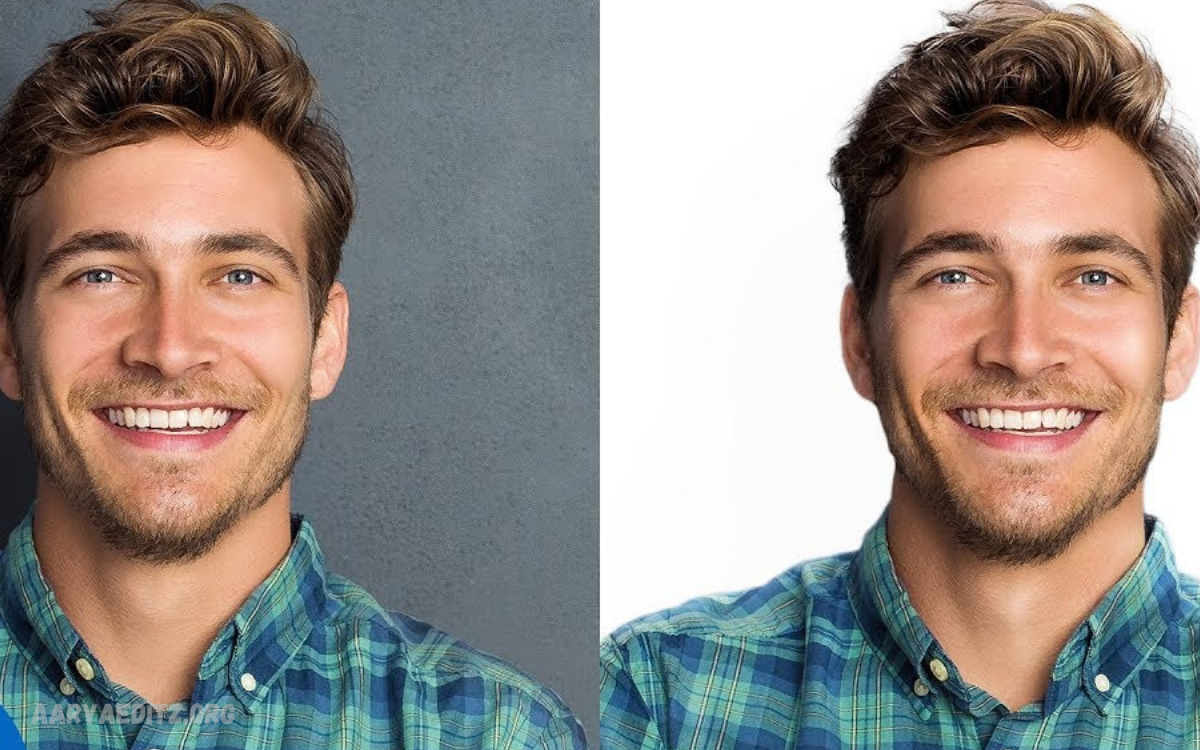
One trend that continues to captivate enthusiasts and professionals alike is the Beautiful White Background Dual Photo Editing technique. This style enhances images with a clean, crisp white backdrop while showcasing two subjects or moments, creating a balanced and striking visual appeal. Whether it’s for portraits, social media posts, or personal projects, this editing style allows the focus to remain solely on the individuals or objects in the image, eliminating distractions from busy backgrounds.
The white background acts as a perfect canvas, offering a sense of simplicity and elegance. By placing two distinct images or subjects next to each other, editors can create a stunning visual contrast or harmony, depending on the desired effect. The dual approach adds an element of storytelling—capturing two personalities, emotions, or memories side by side.
It is often used for professional headshots, wedding photos, and product photography, where clarity and aesthetic perfection are essential. With the right skills, you can transform your photos into eye-catching works of art with just a few simple edits, making them perfect for online portfolios, advertisements, or keepsakes.
How to Create Stunning Dual Photos with a White Background
Creating stunning dual photos with a white background can elevate your images to a whole new level, giving them a polished and professional look. Here’s a step-by-step guide to help you master the art of dual photo editing with a clean white backdrop:
Choose Your Photos Carefully
Select two high-quality images that complement each other in terms of lighting, composition, and theme. Whether they’re portraits, product shots, or any other type of image, make sure the subjects are clearly defined to stand out against the white background.
Use Photo Editing Software
To start editing, use a reliable photo editing tool like Adobe Photoshop, GIMP, or any app with similar functionality. These platforms offer the flexibility needed to work with multiple layers and advanced editing techniques.
Remove the Backgrounds
Carefully remove the background from both photos using the pen tool or magic wand tool. This will isolate your subjects and prepare them for placement on the white background. Make sure the edges are clean and sharp for a professional look.
Set a Pure White Background
Please create a new layer beneath both images and fill it with pure white. This will serve as a clean backdrop that enhances the focus on your subjects. To maintain a flawless effect, make sure there’s no shadow or texture on the white background.
Position the Images
Position the two images side by side, ensuring there’s adequate space between them. You can also adjust the size and orientation to create the best balance. Make sure the images don’t look cramped and have room to breathe.
Blend and Adjust Lighting
Adjust the lighting and contrast of each image to ensure they match seamlessly. The brightness/contrast or curves tool. Make sure the lighting on both images feels natural and consistent.
Add Final Touches
To enhance the overall look, add finishing touches like soft shadows or subtle borders around each image. These small details can make a big difference in giving your dual photos depth and dimension.
Save and Export
Once satisfied with your edits, save your work in the desired format (JPEG, PNG, etc.) and export it. Your stunning dual photo with a beautiful white background is now ready to be shared!
This technique works well for social media, portfolios, advertisements, or any project where a minimalist and professional look is key. Experiment with different combinations to make your dual photos stand out!
Why White Backgrounds Enhance Your Photo Editing Game?
White backgrounds are a timeless, versatile tool in photo editing that can take your images from good to great. Here’s why they are so effective and how they can enhance your photo editing skills:
Creates Focus on the Subject
One of the most powerful aspects of a white background is its ability to remove distractions. By using a clean, neutral backdrop, you ensure that all attention is directed towards the subject of your photo. This is especially important for portraits, product photography, and any scenario where you want the subject to stand out.
Adds a Clean and Professional Look
White backgrounds give your images a polished, minimalist appearance. They make your photos look more refined and professional, which is why they are widely used in business settings, headshots, and fashion photography. The simplicity of white helps elevate the overall aesthetic and gives your images a high-quality feel.
Versatility in Editing
With a white background, your editing options expand. White’s neutrality works well with almost any color palette, allowing you to adjust the subject’s lighting, contrast, and saturation without worrying about clashing with the background. It also offers flexibility when adding text, graphics, or other elements to your image.
Highlights, Colors, and Details
When paired with a white backdrop, colors and details in your subject become more prominent. The contrast between a white background and the subject makes vibrant colors pop and allows intricate details to stand out more clearly. This makes white backgrounds ideal for showcasing fashion, products, or even food photography.
Simplicity Equals Elegance
Sometimes, less is more, and a white background creates an elegant simplicity that doesn’t overwhelm the viewer. This clean aesthetic works particularly well in portfolio shots, e-commerce websites, and any project that requires a sleek and straightforward presentation.
Consistency Across Multiple Photos
When editing a series of images—such as a product lineup or a set of portraits—using a white background ensures visual consistency. This consistency helps create a cohesive look, making the overall set feel professional and unified. It’s especially useful when you need to showcase multiple items or portraits in a similar style.
Easy to Manipulate
From an editing perspective, a white background is easy to manipulate. Whether you need to adjust the subject’s position, add shadows, or blend two images, the neutral nature of the white background makes these changes seamless. It’s also easier to isolate the subject from the background, making the editing process smoother and more efficient.
Timeless Appeal
White is classic and never goes out of style. Whether it’s for social media, advertising, or print, a white background ensures your images remain relevant and visually appealing, no matter the trends. It’s a timeless choice that keeps your photos looking fresh and professional for years.
Incorporating a white background into your photo editing process brings clarity, elegance, and professionalism to your images. It helps highlight your subject, offers editing flexibility, and creates a clean, striking visual. Mastering the use of white backgrounds is a game-changer if you want to elevate your photo editing game!
May you also like it:
Romantic Love Poster Editing with Soft Green Background in PicsArt
Trend Love Lyrics Poster Style Editing with Dual Tone Background in PicsArt
Best Blur Background Lightroom Presets for Editor
Beautiful White Background Flower Shape Multiple Photo Editing in PicsArt
The Art of Dual Photo Editing: Tips for a Perfect White Background
Dual photo editing is a creative technique that allows you to combine two distinct images into one seamless visual. When paired with a white background, the effect is clean, striking, and professional. Whether you’re creating side-by-side portraits, product displays, or artistic compositions, achieving a perfect dual photo edit requires some finesse. Here are essential tips to help you master the art of dual photo editing with a flawless white background:
Choose Complementary Images
To create a balanced and harmonious dual image, start by selecting photos that complement each other. This doesn’t necessarily mean they have to be identical in terms of lighting and composition, but they should work well together in tone and mood. For example, you can pair portraits that share a similar color palette or capture two different perspectives on the same subject.
Ensure Proper Lighting
Lighting plays a crucial role in achieving a natural and cohesive look. Both images should have consistent lighting, especially when placed side by side. If the illumination differs significantly between the two, it can make the edit look unnatural. Adjust the brightness and contrast in your editing software to match the lighting conditions across both images. This ensures the final result feels unified.
Perfect Your Background Removal
A clean, crisp white background can make or break your dual photo edit. To achieve a seamless effect, carefully remove the existing backgrounds of both photos. Use tools like the pen tool, magic wand, or masking tool in photo editing software to isolate the subject carefully. Ensure that the edges are smooth and free of any leftover background elements, as this can disrupt the overall look.
Use a Solid White Backdrop
Once the subjects are isolated, place them on a pure white background. Avoid any textures, shadows, or gradients in the white backdrop, as these can distract from the subject and create an inconsistent look. A clean, solid white background ensures that the focus stays on the subjects, allowing them to pop.
Balance the Composition
The key to a successful dual photo edit is balance. When placing the two images side by side, ensure that the composition feels visually appealing and not overcrowded. Leave enough space between the subjects so they don’t feel cramped. You can also experiment with alignment, whether you prefer the subjects aligned vertically or horizontally. A balanced composition helps create a pleasing flow and makes the image feel intentional.
Adjust the Size and Proportions
It’s essential to ensure that the two subjects are proportional to each other. If one image is much larger than the other, it can create an imbalance. Adjust the size of the images so they align well and avoid distortion by maintaining their original proportions. If necessary, scale down or crop the photos to create a more harmonious effect.
Add Subtle Shadows for Depth
To make your dual photo edit feel more realistic, consider adding soft, subtle shadows behind the subjects. Shadows can add depth and dimension, preventing the subjects from appearing “cut out” or flat against the white background. Ensure the shadows are soft and subtle so they don’t overpower the image. Use a low opacity and blurred effect for a natural look.
Fine-Tune the Edges
One of the most critical steps in creating a polished dual photo edit is refining the edges of your subjects. Use a soft brush tool or a feathered selection tool to smooth any harsh edges, ensuring that the transition between the subject and the white background is seamless. A clean transition will give your image a professional finish.
Consider Adding Text or Graphics
Depending on the purpose of your dual photo edit, you might want to add text, logos, or other graphic elements. When doing so, ensure that the typography and graphics complement the minimalist white background. Keep the design simple and elegant, avoiding anything too flashy that could take away from the subjects.
Experiment with Color Grading
For a more artistic touch, try adjusting the color tones of both images to create a cohesive look. Whether you choose to go with a warm or cool color grading, ensure the two subjects match in terms of color tone, which will help create a more unified visual. Color grading can elevate your images, adding mood and sophistication to the final result.
Save Your Work in High-Resolution
Once you’ve completed your dual photo edit, make sure to save it in a high-resolution format. This ensures that your photo remains sharp and clear when shared online or printed. Save your project in multiple formats (like JPEG, PNG, or TIFF) to accommodate different needs, whether for social media, print, or portfolios.
Mastering dual photo editing with a white background creates stunning, professional images that stand out. Focus on the details—lighting, composition, background removal—and remember that simplicity is often key. Whether you’re a beginner or a seasoned editor, these tips will help you create flawless dual photos that are polished, clean, and visually impactful. Happy editing!
Beautiful white background dual photo editing is an incredibly versatile and effective technique for creating clean, professional-looking images. By combining two subjects or moments side by side against a neutral white backdrop, you can focus the viewer’s attention entirely on the subject, free from distractions. This style not only enhances the visual appeal but also adds an air of elegance, simplicity, and sophistication to any image.
How to Use White Backgrounds for a Clean, Professional Look

Download
White backgrounds are a staple in professional photo editing because they create a clean, minimalist aesthetic that highlights the subject without any distractions. Whether you’re photographing portraits, products, or events, here’s how to effectively use white backgrounds to achieve a polished and professional look:
Choose the Right Lighting
The key to a successful white background is ensuring that the lighting is even and soft. Harsh lighting can create shadows or uneven exposure, which can detract from the clean look. Use softbox lights or diffusers to spread light evenly across your subject and the background. Proper lighting will ensure that the white background remains pure and crisp while also highlighting your subject in the best possible way.
Create a Seamless Background
For the cleanest look, ensure that your white background is seamless and free from wrinkles, shadows, or any texture. This is especially important if you’re photographing on a physical backdrop. If you’re editing images, make sure the white background in your software is solid, without any gradient or shading. A seamless background creates the illusion of infinite space, making the subject appear as if it’s floating, which adds to the professional appeal.
Ensure Proper Subject Isolation
To keep the focus entirely on the subject, ensure that the background is correctly isolated. When editing, carefully remove any unwanted background elements around the subject. Any stray pixels or background remnants can disrupt the clean, polished look, so make sure the subject is sharply defined against the white backdrop.
Mind Your Composition
In professional photography, composition plays a vital role. For white background shots, leave enough space around your subject to avoid overcrowding the frame. Ensure your subject is centered or positioned in a way that feels balanced. When placing multiple subjects or objects, such as in dual photo editing, consider the spacing and alignment to create harmony in the image. Proper composition ensures that the subject stands out without feeling cramped or lost in the frame.
Adjust White Balance
The white background indeed appears white, not with a yellowish or blue tint. Before you start editing, ensure that the white balance is set correctly in your camera or editing software. If you’re editing an image, use the temperature and tint settings to adjust the overall tone and ensure the background looks natural and pure.
Using white backgrounds effectively is a powerful technique for creating clean, professional-looking images. By focusing on proper lighting, seamless background setup, and careful editing, you can elevate your photos to a whole new level. Whether you’re aiming for a minimalist product shot or a sleek portrait, a white background helps keep the focus on your subject, ensuring your image looks polished, refined, and high-quality.
Frequently Asked Questions
How Do I Ensure My Dual Photo Looks Natural?
To make your dual photo look natural, ensure the lighting, shadows, and proportions of both images match. Adjust the brightness, contrast, and color grading for consistency. Also, make sure the edges of the subjects are clean and smooth to avoid harsh transitions.
What Is the Best Size for a White Background Dual Photo?
The ideal size for a white background dual photo depends on the intended use. For social media, a square (1080x1080px) or vertical (1080x1350px) resolution works well. For prints or portfolios, higher resolutions like 3000x4000px ensure the image stays sharp and clear.
Can I Add Text or Graphics to My Dual Photo?
Yes! Adding text, logos, or other graphics can enhance your dual photo. However, it’s essential to keep the design balanced and straightforward. Choose typography that complements the clean aesthetic of the white background, and avoid over-cluttering the image with excessive text or designs.
What Common Mistakes Should I Avoid in Dual Photo Editing?
Common mistakes include poor background removal (leaving rough edges), inconsistent lighting between the images, or overcrowding of the frame with subjects. It’s also essential to ensure that the images are balanced in size and placement, as poorly aligned subjects can create an awkward composition.
How Do I Save and Export My Final Dual Photo?
After completing your dual photo edit, save it in high resolution to preserve quality. Depending on your needs, you can export it in different formats like JPEG, PNG, or TIFF. JPEG is perfect for online use, while PNG is ideal for transparent backgrounds or high-quality prints.
Conclusion
Beautiful white background dual photo editing is an incredibly versatile and effective technique for creating clean, professional-looking images. By combining two subjects or moments side by side against a neutral white backdrop, you can focus the viewer’s attention entirely on the subject, free from distractions. This style not only enhances the visual appeal but also adds an air of elegance, simplicity, and sophistication to any image.